When it comes to advanced post-production, understanding your camera's color modes is crucial. Two of the most common logarithmic (log) profiles you'll encounter are D-Log M and Hybrid Log-Gamma (HLG). While they both aim to capture a wider dynamic range, they do so in fundamentally different ways, each with its own advantages and ideal use cases.
D-Log M: The Post-Production Powerhouse
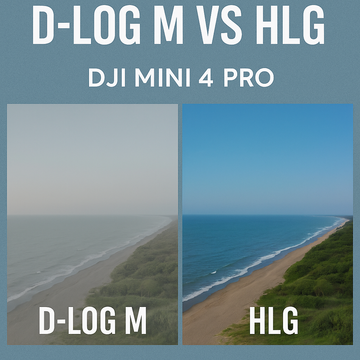
D-Log M is DJI's proprietary flat color profile, designed to capture a wide dynamic range and retain as much information as possible in the shadows and highlights. The "M" stands for "middle," indicating that it's a logarithmic profile that prioritizes a balanced exposure. . When you shoot in D-Log M, the footage appears very desaturated and low-contrast. This is intentional. The flat look is not meant to be used as-is; it's a blank canvas that gives you maximum flexibility during color grading.
Why Use D-Log M?
-
Maximum Flexibility: The primary reason to shoot in D-Log M is for maximum control in post-production. It's the ideal choice for professional filmmakers and colorists who need to push and pull colors, adjust exposure, and create specific looks without the footage falling apart.
-
High Dynamic Range: It excels at preserving detail in both bright skies and deep shadows, which is essential for scenes with high contrast.
-
Creative Control: If you have a specific artistic vision for your final look, D-Log M is the best starting point. It allows you to create unique color palettes and cinematic grades from scratch.
However, be aware that D-Log M requires a significant amount of work in post-production. You'll need to apply a LUT (Look-Up Table) to "de-log" the footage, which brings it back to a standard color space, before you even begin the creative grade.
HLG: The HDR Shortcut
HLG, or Hybrid Log-Gamma, is a color mode designed for High Dynamic Range (HDR) content. Unlike D-Log M, HLG footage is designed to look good right out of the camera, with a more vibrant, finished appearance. It's a "hybrid" because it combines the benefits of a logarithmic curve for highlights with a standard gamma curve for mid-tones and shadows. This means it's less "flat" than D-Log M.
Why Use HLG?
-
Shorter Workflow: If you need a quick turnaround or have minimal time for post-production, HLG is a fantastic choice. The footage already has a good amount of color and contrast, so it often requires little more than minor adjustments.
-
HDR Compatibility: HLG is a broadcast standard for HDR content. If your final delivery is for an HDR-compatible display (like a modern TV or monitor), shooting in HLG ensures a seamless and accurate HDR workflow.
-
Better for Beginners: For those who are newer to color grading, HLG offers a more forgiving starting point. It provides a significant boost in dynamic range without the intimidatingly flat look of a true log profile.
While HLG is more user-friendly, it offers less flexibility than D-Log M. Pushing the colors too much can lead to artifacts or a loss of quality, as the footage is already more compressed than D-Log M's blank slate.
Choosing the Right Mode
The choice between D-Log M and HLG boils down to your workflow and final delivery.
-
Choose D-Log M if you are a professional colorist or filmmaker, have a dedicated post-production workflow, and prioritize maximum creative control. This is for projects where you want to create a highly specific, polished look.
-
Choose HLG if you need a fast workflow, are shooting for a quick turnaround, or your final destination is an HDR-compatible screen. It's the perfect balance of a cinematic look with a user-friendly process.
Understanding these two color modes empowers you to make a conscious decision on set that will save you time and headaches in post-production. Ultimately, there is no single "better" mode—only the right mode for your specific project.
#Mini4Pro
#DJI
#AerialVideography
#DronePhotography
#DLogM
#HLG
#ColorGrading
#PostProduction
#DroneFilmmaking
#HDR
#Cinematic
#TechReview
#DroneTips
#Videography
#FilmProduction