So, you’ve unboxed your brand-new DJI Mic 3—now what? Whether you’re a first-time wireless mic user or upgrading from a previous generation, setting up the Mic 3 is quick and intuitive. In this post, we’ll walk you through the step-by-step process to get started, ensuring you’re ready to capture pro-level audio right away.
🔋 Step 1: Charge Everything Up
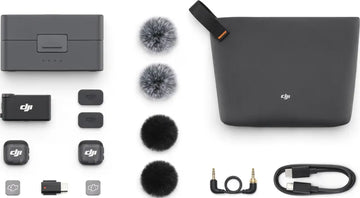
Inside the box, you’ll find a charging case that houses the two transmitters and receiver. Plug it in using the USB-C cable and let everything fully charge before your first shoot.
-
Pro Tip: The case supports fast charging, so even a quick top-up can give you hours of recording time.
🎛️ Step 2: Power On & Pair Devices
Open the case and press the power button on both transmitters and the receiver. The system auto-pairs instantly—no need for manual syncing. You’ll see pairing confirmation on the receiver’s color display.
-
Pro Tip: If you ever need to re-pair manually, just long-press the pair button until the devices reconnect.
🎤 Step 3: Choose Your Mounting Method
DJI gives you multiple ways to mount the transmitters:
-
Clip-On: Use the magnetic clips to attach to clothing.
-
Magnet Mount: Hide the transmitter under a shirt with the included magnets.
-
Accessory Mounting: Use the cold shoe or TRS cable to mount on cameras.
This flexibility makes it easy to adapt for interviews, podcasts, or discreet vlogging.
🌬️ Step 4: Attach Windscreens for Outdoor Shoots
For windy conditions, twist on the included windscreens. The Mic 3 includes four windscreens, so you’ll always have spares. They’re compact, secure, and reduce wind noise without muffling voices.
🎚️ Step 5: Adjust Audio Settings
Using the receiver’s rotary dial and color display, you can:
-
Adjust gain levels
-
Switch between stereo or mono modes
-
Apply two-level noise cancelling
-
Select one of three voice tone presets for natural, bright, or deep sound
This hands-on control makes it simple to fine-tune your audio on the spot.
📹 Step 6: Connect to Your Recording Device
The DJI Mic 3 is versatile with its connection options:
-
Cameras: Use the 3.5mm TRS cable
-
Smartphones/Tablets: Plug in the USB-C or Lightning adapter
-
Computers: Connect directly via USB-C
Once plugged in, the receiver delivers clean audio directly to your device—no drivers or extra setup needed.
🎧 Step 7: Test & Record
Before your first official shoot, do a quick sound test. Monitor levels on the receiver screen, adjust gain if necessary, and check that noise cancelling is applied when needed.
Now you’re ready to record with broadcast-quality sound—clipping-free, stable, and crystal-clear.
✅ Final Thoughts
The DJI Mic 3 setup process is streamlined and creator-friendly. With auto-pairing, multiple mounting options, intuitive on-screen controls, and a robust set of accessories, you’ll be capturing pro audio within minutes of unboxing.
For vloggers, filmmakers, podcasters, or educators, it’s one of the most plug-and-play wireless mic systems on the market today.
🛒 Available Now at SpeedyDrone Canada
Ready to upgrade your audio workflow? The DJI Mic 3 is available now at SpeedyDrone Canada—visit our Toronto store at 991 Bay Street or shop online at speedydronecanada.com.
#DJIMic3 #WirelessMicSetup #CreatorGuide #ProAudio #ContentCreatorGear #FilmmakingTools #PodcastSetup #DJI #GettingStarted #speedydrone


